

A delightful twist on the classic buckeye candy, this Buckeye Roll combines the rich flavors of peanut butter and chocolate in a rolled dessert that’s as stunning as it is delicious. Perfect for holiday gatherings, potlucks, or a simple indulgent treat, this dessert is sure to impress everyone who tastes it.
Why You’ll Love This Recipe
- Combines classic peanut butter and chocolate flavors in a creative presentation.
- No baking required, making it an easy and fuss-free dessert.
- Perfect for sharing, thanks to its convenient rollable form.
- Can be prepared ahead of time for busy schedules.
- A visually striking dessert that looks as good as it tastes.
Ingredients
(Tip: You’ll find the full list of ingredients and measurements in the recipe card below.)
- Creamy peanut butter
- Powdered sugar
- Butter
- Vanilla extract
- Semi-sweet chocolate chips
- Heavy cream
Directions

- Prepare the Peanut Butter Mixture: Combine peanut butter, powdered sugar, and melted butter in a large mixing bowl. Mix until a smooth, dough-like consistency is achieved.
- Roll the Dough: Place the mixture between two sheets of parchment paper and roll it out into a rectangle about ¼-inch thick.
- Prepare the Chocolate Layer: Melt the chocolate chips with heavy cream in a double boiler or microwave, stirring until smooth.
- Spread the Chocolate: Remove the top sheet of parchment paper from the peanut butter layer and evenly spread the melted chocolate over it.
- Roll and Chill: Starting from one end, carefully roll the layered mixture into a tight log, using the parchment paper to guide you. Wrap the roll in the parchment and refrigerate for at least 2 hours, or until firm.
- Slice and Serve: Once firm, slice the roll into rounds and serve chilled.
Servings and Timing
- Servings: Approximately 12 slices
- Prep Time: 20 minutes
- Chill Time: 2 hours
- Total Time: 2 hours 20 minutes
Variations
- Nut-Free Version: Substitute sunflower seed butter for peanut butter.
- Dark Chocolate: Use dark chocolate instead of semi-sweet for a richer flavor.
- Add Texture: Sprinkle crushed peanuts or toffee bits over the chocolate layer before rolling.
- Festive Flair: Decorate the outside with a drizzle of white chocolate or holiday sprinkles before slicing.
- Vegan Option: Use vegan butter, dairy-free chocolate chips, and coconut cream in place of heavy cream.
Storage/Reheating
- Refrigeration: Store slices in an airtight container in the refrigerator for up to 7 days.
- Freezing: Wrap slices individually in plastic wrap and store in a freezer-safe bag for up to 3 months. Thaw in the refrigerator before serving.
- Reheating: This dessert is best served chilled and does not require reheating.
FAQs
1. Can I use natural peanut butter for this recipe?
Yes, but the texture may be softer. Stir well to ensure the oil is fully incorporated before using.
2. How do I keep the roll from cracking while rolling?
Ensure the peanut butter mixture is pliable by warming it slightly if necessary and roll it gently.
3. Can I double the recipe?
Absolutely! Simply double the ingredients and adjust the rolling and chilling time as needed.
4. What can I use instead of heavy cream?
Coconut cream or evaporated milk works as a substitute for heavy cream.
5. How long can this dessert stay at room temperature?
It’s best to keep the roll refrigerated. At room temperature, it can soften within 1–2 hours, depending on the climate.
6. Can I use white chocolate instead of semi-sweet?
Yes, but it will result in a much sweeter dessert.
7. Why is my chocolate layer separating from the peanut butter?
Ensure the peanut butter layer is dry and the chocolate is slightly cooled but still spreadable when applied.
8. Can I add other flavors to the chocolate?
Yes, you can add a few drops of mint extract or a pinch of cinnamon to the melted chocolate.
9. What type of chocolate chips should I use?
Semi-sweet chocolate chips are ideal, but you can use milk or dark chocolate based on your preference.
10. Can I make this ahead of time?
Yes, it’s perfect for preparing in advance. Store it in the refrigerator until you’re ready to serve.
Conclusion
Buckeye Roll is a creative and mouthwatering dessert that takes the classic buckeye candies to the next level. Its no-bake simplicity and elegant presentation make it a favorite for any occasion. Try this recipe today, and enjoy the perfect harmony of chocolate and peanut butter in every bite!
Print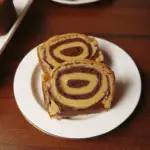
Buckeye Roll Recipe
- Prep Time: 20 minutes
- Cook Time: 10 minutes
- Total Time: 1 hour 30 minutes (including cooling time)
- Yield: 10–12 slices 1x
- Category: Dessert
- Method: Baking
- Cuisine: American
- Diet: Vegetarian
Description
This Buckeye Roll combines a rich chocolate sponge cake with a smooth peanut butter filling, reminiscent of the beloved Buckeye candies. It’s a perfect dessert for chocolate and peanut butter lovers.
Ingredients
For the Cake:
- Cooking spray, for pan
- 3 large eggs
- 2/3 cup granulated sugar
- 2 teaspoons vanilla extract
- 1/2 teaspoon salt
- 1 teaspoon baking powder
- 1/3 cup unsweetened cocoa powder, plus more for dusting
- 3/4 cup all-purpose flour
For the Filling:
- 2 cups creamy peanut butter
- 6 ounces cream cheese, softened to room temperature
- 1/4 cup unsalted butter, softened to room temperature
- 2 cups powdered sugar
- 1/4 cup whole milk
- 1/2 teaspoon salt
Instructions
- Prepare the Cake:
- Preheat your oven to 350°F (175°C).
- Line a 15” x 10” jelly roll pan with parchment paper and lightly grease with cooking spray.
- In a large bowl, use a hand mixer to beat the eggs on high speed until light and foamy, about 3 minutes.
- Add the granulated sugar, vanilla extract, and salt; beat until fully combined.
- Sift in the baking powder, cocoa powder, and flour; mix until just combined.
- Spread the batter evenly in the prepared pan.
- Bake for 8-10 minutes, until the cake is set and springs back when touched.
- Roll the Cake:
- While the cake is baking, lay a clean kitchen towel on a flat surface and dust it generously with cocoa powder.
- Once the cake is done, run a knife along the edges to loosen it, then carefully invert it onto the prepared towel.
- Peel off the parchment paper.
- Starting from a short end, gently roll the cake up with the towel into a tight spiral.
- Allow it to cool completely, at least 1 hour.
- Prepare the Filling:
- In a large bowl, combine the peanut butter, cream cheese, and butter.
- Using a hand mixer, beat until smooth and fluffy.
- Gradually add the powdered sugar, mixing well after each addition.
- Pour in the milk and add the salt; beat until the filling is smooth and spreadable.
- Assemble the Roll:
- Once the cake has cooled, carefully unroll it. It’s okay if it doesn’t lie completely flat.
- Spread the peanut butter filling evenly over the cake, leaving a small border around the edges.
- Gently re-roll the cake without the towel, making sure to keep it tight but without squeezing out the filling.
- Place the rolled cake seam-side down on a serving platter.
- Serve:
- Dust the top with additional cocoa powder if desired.
- Slice and serve.
Notes
- Ensure the cake is completely cool before adding the filling to prevent it from melting.
- Rolling the cake while it’s warm helps prevent cracks.
- For a neater appearance, trim the ends of the roll before serving.
Your email address will not be published. Required fields are marked *