
These Copycat Little Debbie Valentine Cakes are a delightful homemade version of the nostalgic treat we all know and love. They feature soft, fluffy layers of cake, a sweet and creamy filling, and a smooth coating of frosting—all shaped into adorable hearts. Perfect for Valentine’s Day or any occasion that calls for a special, heartfelt dessert.
Why You’ll Love This Recipe
- Brings back childhood memories with a homemade twist.
- Customizable—choose your favorite cake and frosting flavors.
- Fun and easy to make for kids and adults alike.
- Perfect for gifting or serving at Valentine’s Day celebrations.
Ingredients
(Tip: You’ll find the full list of ingredients and measurements in the recipe card below.)
- All-purpose flour
- Granulated sugar
- Baking powder
- Salt
- Unsalted butter
- Eggs
- Vanilla extract
- Buttermilk
- Powdered sugar
- Heavy cream
- Food coloring (optional for pink or red cakes)
- White chocolate or candy melts (for the outer coating)
Directions

- Prepare the Cake Batter: Preheat your oven and prepare your cake pans by greasing and lining them with parchment paper. In a large mixing bowl, combine the dry ingredients. Mix in the wet ingredients until you have a smooth batter.
- Bake the Cake: Pour the batter evenly into the prepared pans and bake until a toothpick inserted in the center comes out clean. Let the cakes cool completely.
- Cut into Heart Shapes: Use a heart-shaped cookie cutter to cut out hearts from the cake layers.
- Make the Filling: Beat together butter, powdered sugar, and heavy cream until you have a smooth and fluffy filling.
- Assemble the Cakes: Spread a layer of filling on one heart-shaped cake and top it with another cake to create a sandwich.
- Coat the Cakes: Melt the white chocolate or candy melts and carefully coat each cake sandwich, ensuring an even layer. Allow the coating to set on a wire rack.
- Decorate: Add sprinkles, drizzle with additional chocolate, or pipe designs onto the cakes if desired.
Servings and Timing
- Servings: This recipe makes approximately 12-15 heart cakes, depending on the size of your cutter.
- Prep Time: 30 minutes
- Cook Time: 20 minutes
- Total Time: 1 hour
Variations
- Flavor Options: Use chocolate cake instead of vanilla for a rich twist.
- Different Shapes: Make these cakes for other holidays by using seasonal cookie cutters.
- Frosting Fillings: Swap the vanilla filling for cream cheese frosting, chocolate ganache, or fruit jam.
- Colorful Coating: Use pastel candy melts for a spring or Easter theme.
Storage/Reheating
- Storage: Store the cakes in an airtight container at room temperature for up to 3 days or in the refrigerator for up to a week.
- Freezing: Wrap each cake individually in plastic wrap and store in a freezer-safe container for up to 2 months. Thaw in the refrigerator before serving.
- Reheating: These cakes are best enjoyed at room temperature and do not require reheating.
FAQs
How do I keep the cake layers moist?
Use buttermilk in the batter and avoid overbaking. Store the cakes in an airtight container to prevent drying out.
Can I use a boxed cake mix?
Yes, a boxed mix can save time and still taste great! Just follow the box instructions and cut into heart shapes once baked.
What’s the best way to coat the cakes?
Place the cakes on a wire rack and pour the melted chocolate or candy melts over them for an even coating.
Can I make these cakes gluten-free?
Absolutely! Substitute the all-purpose flour with a 1:1 gluten-free baking flour.
How can I prevent the chocolate coating from cracking?
Ensure the cakes are at room temperature before coating, and avoid refrigerating the melted chocolate.
What can I use instead of white chocolate?
Candy melts or almond bark are great alternatives that are easy to work with.
Can I add sprinkles to the batter?
Yes! Fold in some sprinkles to create a funfetti-style cake.
Do I need special tools to make this recipe?
A heart-shaped cookie cutter is recommended, but you can also cut shapes freehand with a knife.
How far in advance can I make these cakes?
You can make them up to 2 days in advance and store them in an airtight container.
Are these cakes safe for kids with allergies?
Check all ingredient labels carefully for allergens like nuts, gluten, or dairy. You can adapt the recipe with allergy-friendly substitutes as needed.
Conclusion
These Copycat Little Debbie Valentine Cakes are the perfect sweet treat to show your love this season. With their adorable shape, nostalgic flavors, and endless customization options, they’re guaranteed to be a hit. Whether you’re gifting them, sharing them at a party, or indulging on your own, these cakes will add a touch of love to any occasion!
Print
Copycat Little Debbie Valentine Cakes
- Prep Time: 25 minutes
- Cook Time: 25 minutes
- Total Time: 1 hour 10 minutes
- Yield: 10–12 heart-shaped cakes 1x
- Category: Dessert
- Method: Baking
- Cuisine: American
- Diet: Vegetarian
Description
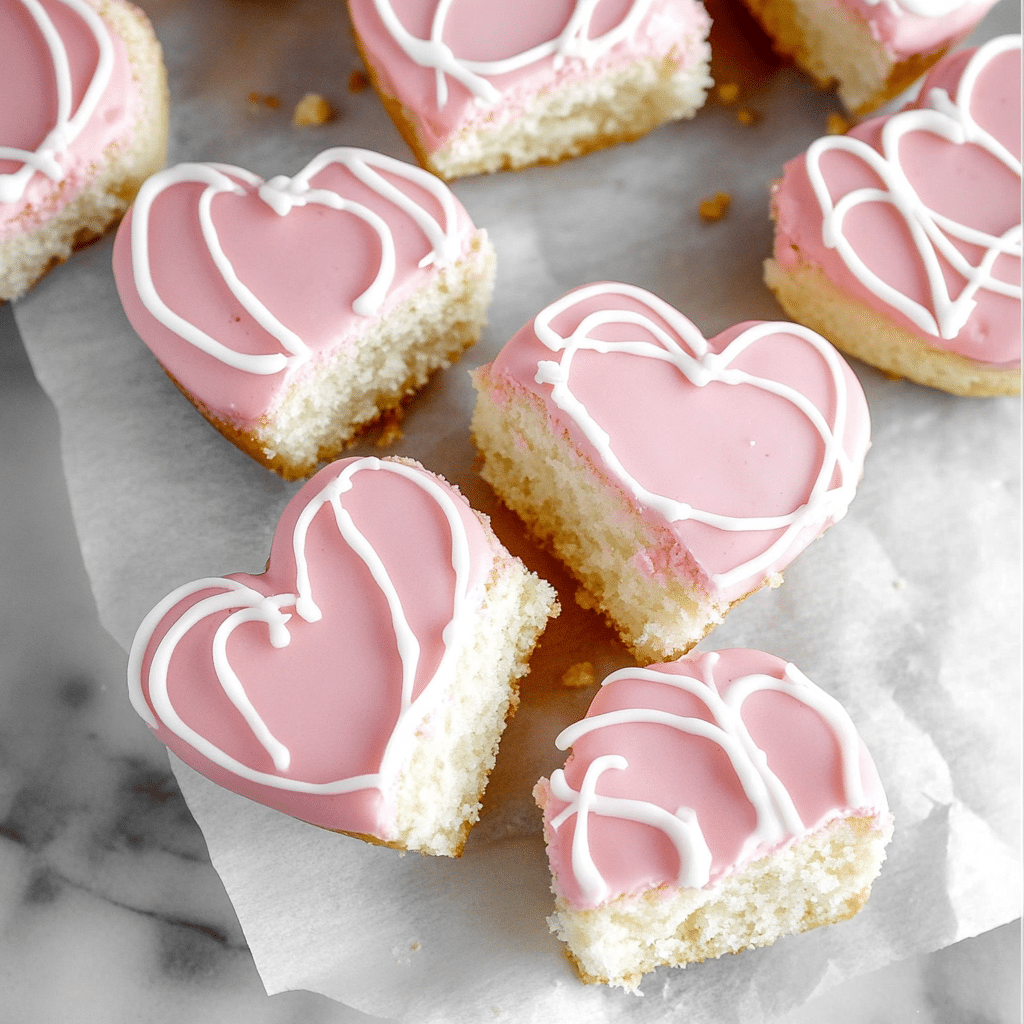
These Copycat Little Debbie Valentine Cakes are soft, fluffy, heart-shaped vanilla cakes layered with a creamy filling and coated in a sweet pink glaze. They’re a nostalgic treat, perfect for Valentine’s Day, birthdays, or whenever you want a cute and delicious dessert!
Ingredients
For the Cake:
- 2 1/2 cups all-purpose flour
- 2 1/2 teaspoons baking powder
- 1/2 teaspoon baking soda
- 1/2 teaspoon salt
- 3/4 cup unsalted butter, softened
- 1 3/4 cups granulated sugar
- 3 large eggs
- 2 teaspoons vanilla extract
- 1 cup whole milk
For the Filling:
- 1/2 cup unsalted butter, softened
- 1 3/4 cups powdered sugar
- 1 teaspoon vanilla extract
- 2 tablespoons heavy cream
For the Glaze:
- 2 cups powdered sugar
- 3 tablespoons milk
- 1 teaspoon vanilla extract
- Pink gel food coloring
Instructions
- Prepare the Cake:
- Preheat your oven to 350°F (175°C). Line a large baking sheet (or two 9×13-inch pans) with parchment paper.
- In a medium bowl, whisk together the flour, baking powder, baking soda, and salt. Set aside.
- In a large mixing bowl, cream together the butter and sugar until light and fluffy. Add the eggs one at a time, beating well after each addition. Mix in the vanilla extract.
- Gradually add the dry ingredients to the wet ingredients, alternating with the milk. Start and end with the dry ingredients. Mix until just combined.
- Spread the batter evenly into the prepared pan(s) and smooth the top with a spatula.
- Bake for 20-25 minutes, or until a toothpick inserted into the center comes out clean. Let the cake cool completely in the pan.
- Cut Out the Shapes:
- Once the cake has cooled, use a heart-shaped cookie cutter to cut out pairs of hearts. Set aside.
- Make the Filling:
- In a mixing bowl, beat the butter until creamy. Gradually add powdered sugar, mixing until smooth. Stir in the vanilla extract and heavy cream. Beat until fluffy.
- Spread a layer of filling onto one heart-shaped piece of cake, then top with another heart to create a sandwich. Repeat for all the cakes.
- Prepare the Glaze:
- In a medium bowl, whisk together the powdered sugar, milk, and vanilla extract until smooth. Add pink gel food coloring until you achieve your desired shade.
- Glaze the Cakes:
- Place the cakes on a wire rack over a baking sheet to catch excess glaze. Spoon the pink glaze over the top of each cake, letting it drip down the sides. Allow the glaze to set completely before serving.
Notes
- To make these cakes extra festive, you can decorate with sprinkles or white chocolate drizzle before the glaze sets.
- Store the cakes in an airtight container at room temperature for up to 3 days or in the fridge for up to a week.
Your email address will not be published. Required fields are marked *