
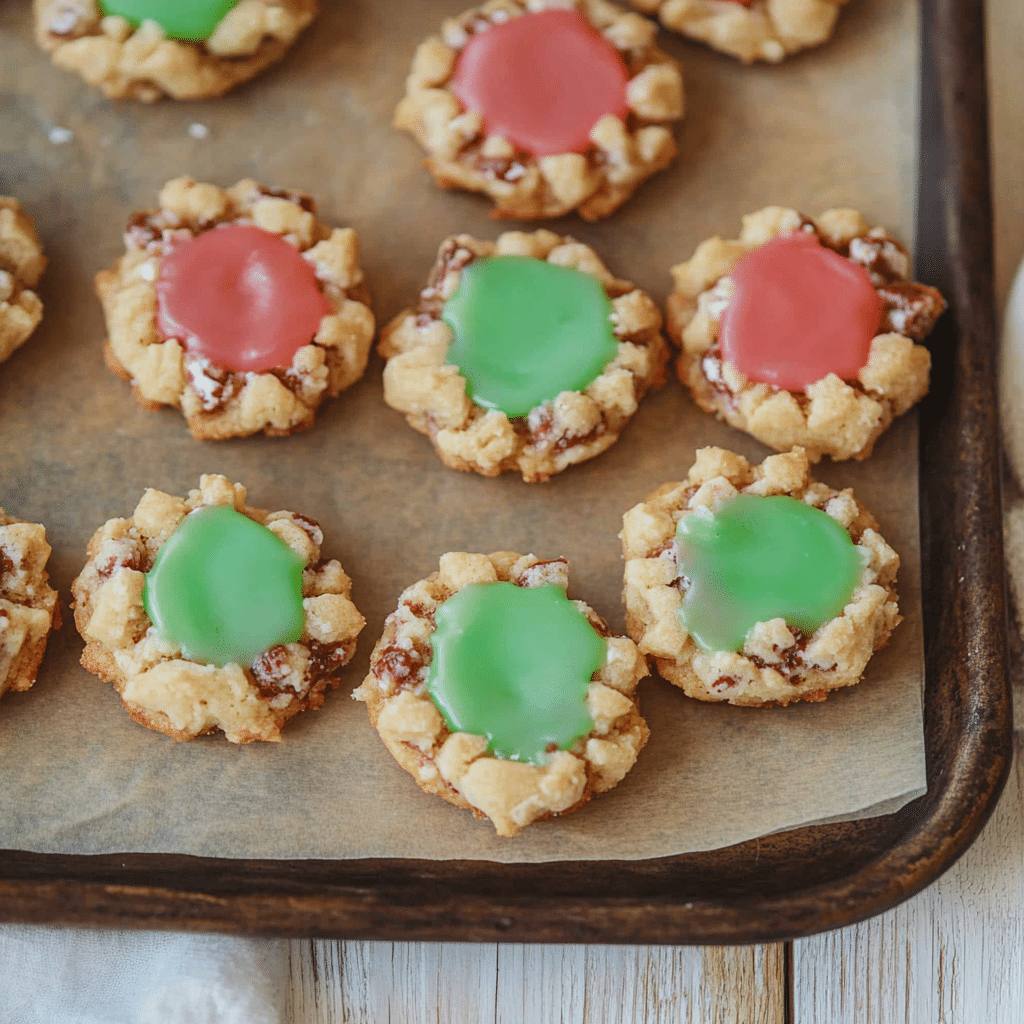
These delightful thumbprint cookies with icing are a classic treat, perfect for any occasion. Soft, buttery cookies filled with a sweet icing center are as beautiful as they are delicious. They’re easy to make, and their versatility allows you to customize the icing colors for holidays, parties, or just to brighten up your day.
Why You’ll Love This Recipe
- Simple Ingredients: Made with pantry staples, you won’t need anything fancy to whip these up.
- Customizable: Change the icing colors to match the theme of any event.
- Kid-Friendly: Fun to make with kids—little ones will love pressing the thumbprint!
- Perfect Texture: These cookies are tender and buttery with a delightful crunch from the icing.
- Great for Gifting: They look as good as they taste, making them a wonderful homemade gift.
Ingredients
(Tip: You’ll find the full list of ingredients and measurements in the recipe card below.)
- Unsalted butter
- Granulated sugar
- Egg yolks
- Vanilla extract
- All-purpose flour
- Powdered sugar
- Milk
- Food coloring (optional)
Directions

- Prepare the Dough: Preheat your oven to 350°F (175°C). In a mixing bowl, cream together the butter and granulated sugar until light and fluffy. Mix in the egg yolks and vanilla extract. Gradually add the flour until the dough forms.
- Shape the Cookies: Roll the dough into small balls and place them on a baking sheet lined with parchment paper. Use your thumb or the back of a spoon to create an indentation in the center of each cookie.
- Bake: Bake the cookies for 12–15 minutes, or until the edges are lightly golden. Let them cool completely on a wire rack.
- Make the Icing: In a small bowl, mix powdered sugar and milk until smooth. Divide the icing into separate bowls if using food coloring, and tint as desired.
- Decorate: Fill each cookie indentation with icing. Let the icing set before serving or storing.
Servings and Timing
- Servings: Approximately 24 cookies
- Prep Time: 15 minutes
- Cook Time: 15 minutes
- Total Time: 30 minutes
Variations
- Jam-Filled: Replace the icing with your favorite jam for a fruity twist.
- Gluten-Free: Use a 1:1 gluten-free flour substitute for the all-purpose flour.
- Chocolate Drizzle: Drizzle melted chocolate over the cookies for an extra indulgent touch.
- Almond Flavor: Add almond extract to the dough or icing for a nutty aroma.
- Sprinkles: Add colorful sprinkles to the icing before it sets for a festive look.
Storage/Reheating
- Storage: Store the cookies in an airtight container at room temperature for up to 5 days.
- Freezing: Place the baked and cooled cookies (without icing) in a freezer-safe container. Freeze for up to 3 months and decorate after thawing.
- Reheating: These cookies don’t require reheating. Simply let frozen cookies thaw at room temperature before serving.
FAQs
Can I make these cookies ahead of time?
Yes! You can prepare the dough and refrigerate it for up to 2 days before baking.
Can I use salted butter?
If using salted butter, reduce the added salt in the recipe by half.
How do I prevent the cookies from spreading?
Chill the dough for 30 minutes before shaping to minimize spreading.
What can I use instead of food coloring?
Natural alternatives like beet juice or turmeric can be used for tinting the icing.
Can I add nuts to the dough?
Yes, finely chopped nuts like almonds or pecans can be folded into the dough.
Is there a dairy-free version?
Substitute butter with vegan butter and milk with plant-based milk.
How do I ensure the icing sets quickly?
Place the decorated cookies in a cool, dry area to speed up the setting process.
Can I double the recipe?
Absolutely! Double the ingredients to make a larger batch.
Can I use royal icing instead of the glaze?
Yes, royal icing works well for a firmer finish.
Are these cookies suitable for gifting?
Yes, they are perfect for gifting! Package them in decorative boxes or tins for a thoughtful treat.
Conclusion
Thumbprint cookies with icing are a timeless classic that brings a touch of elegance to any dessert table. Their buttery texture and customizable design make them a hit with both kids and adults. Whether you’re baking for a party, gifting, or enjoying them with your family, these cookies are sure to please. Give this recipe a try—you won’t be disappointed!
Print
Thumbprint Cookies With Icing
- Prep Time: 15 minutes (plus 1 hour chilling time)
- Cook Time: 16-18 minutes
- Total Time: Approximately 1 hour 35 minutes
- Yield: Approximately 36 cookies 1x
- Category: Dessert
- Method: Baking
- Cuisine: American
- Diet: Vegetarian
Description
These classic thumbprint cookies boast a tender, buttery shortbread base with a sweet, colorful icing center. They’re simple to make and can be customized with your favorite colors and flavors, making them ideal for holidays, parties, or everyday treats.
Ingredients
For the Cookies:
- 1 cup (2 sticks) unsalted butter, softened to room temperature
- 1/3 cup granulated sugar
- 1 teaspoon vanilla extract
- 2 cups all-purpose flour
- 1/4 teaspoon salt
For the Icing:
- 1 cup powdered sugar
- 1 1/2 tablespoons milk (add more if needed)
- 1/2 teaspoon vanilla extract
- Food coloring (optional)
Instructions
- Prepare the Dough:
- In a large mixing bowl, cream together the softened butter and granulated sugar until light and fluffy.
- Mix in the vanilla extract until well combined.
- Gradually add the all-purpose flour and salt, mixing until the dough comes together. The dough may appear crumbly at first but will form a cohesive dough as you continue mixing.
- Cover the dough with plastic wrap and refrigerate for at least 1 hour to firm up.
- Shape the Cookies:
- Preheat your oven to 350°F (175°C). Line a baking sheet with parchment paper.
- Roll the chilled dough into 1-inch balls and place them about 1 inch apart on the prepared baking sheet.
- Use your thumb or the back of a small measuring spoon to create an indentation in the center of each dough ball.
- Bake:
- Bake the cookies in the preheated oven for 10 minutes.
- Remove the baking sheet from the oven and gently press the indentations again to maintain their shape.
- Return the cookies to the oven and bake for an additional 6-8 minutes, or until the edges are lightly golden.
- Allow the cookies to cool on the baking sheet for 1 minute before transferring them to a wire rack to cool completely.
- Prepare the Icing:
- In a small bowl, whisk together the powdered sugar, milk, and vanilla extract until smooth.
- If desired, divide the icing into separate bowls and add a few drops of food coloring to each, mixing until the colors are uniform.
- To achieve your desired consistency, you can add more milk to thin the icing or more powdered sugar to thicken it.
- Fill the Cookies:
- Once the cookies have cooled completely, fill each indentation with the prepared icing.
- Allow the icing to set completely before serving or storing the cookies.
Notes
- For a festive touch, consider adding sprinkles to the icing before it sets.
- These cookies can be stored in an airtight container at room temperature for up to one week.
- If you prefer, you can fill the indentations with jam or preserves instead of icing for a fruity variation.
Your email address will not be published. Required fields are marked *